Reset Windows Vista Password

Posted by: pctutorials  :  Category: Windows

Have you forgotten your Windows Vista account password? If you didn't create a Vista password reset disk, you still have another option. Trinity Rescue Kit is a small Linux distribution (~100MB) that has the capability of clearing your forgotten password. I've used it and it works perfectly.  Here's how to clear your password:

Trinity Rescue Kit Method

  1. Download Trinity Rescue Kit, and burn it to a CD/DVD. http://trinityhome.org/Home/index.php?pid=1&wpid=5&p_node=1&edit_pid=5&front_id=12 .
  2. Boot from the Disc
  3. Boot TRK normally. You will then reach a command line.
  4. Type 'winpass -u Administrator' or instead of Administrator, your user account name at the command prompt.
  5. You will then see Searching and mounting all file system on local machine
  6. Windows NT/2K/XP installation(s) found in: /sda1/Windows Make your choice or ‘q’ to quit [1]:
  7. Press '1' to clear password.
  8. Restart, or if you want, type 'init 0' then power on again, without the disc, and boot into Windows.

Your user account will now have no password on it and you'll be able to log into windows. Thanks to wikihow.com for providing information about the Trinity Rescue Kit. 

If you enjoyed this post, make sure you subscribe to my RSS feed!

Put Vista In Your Name

Posted by: pctutorials  :  Category: Windows

If you have been given or purchased a second hand PC that has Windows Vista on it pre-installed, you may wish to change the registered owner name and/or Organization. It is quite simple to change:

  1. Start Regedit.
  2. Make your way in the registry to 'HKEY_LOCAL_MACHINE> SOFTWARE> MICROSOFT> WINDOWS NT> CURRENTVERSION'.
  3. Change the Registered Owner and Registered Organization entries accordingly.   

If you enjoyed this post, make sure you subscribe to my RSS feed!

Benq E2200HD Good?

Posted by: pctutorials  :  Category: Hardware

The other day I purchased a Benq E2200HD monitor to replace my aging Benq 17" FP71E+. It actually died on me for no reason, hence me not posting any new content. I opened it up and found two power resistors on invertor board loose. I attempted to resolder the resistors but even after the repair, no joy. It will probably go on ebay for someone to use as parts.

As for the new Benq E200HD, is it any good? From my viewpoint, i quite like it. The screen is vibrant (had to turn the brightness down to 65) and running at 1920×1080, the detail is awesome. It also has a HDMI port, which at the moment, have my XBOX 360 attached to. 

Reading about the monitor, there were many people rating this as a great monitor while others did not like it so much. Part of the reason people didn't like it was because of the aspect ratio. The Benq E2200HD monitor has an aspect ratio of 16:9. This is perfect for movies and console gaming because you won't have any black bars on the display. However, most PC monitors have an aspect ratio of 16:10, which means the screen is slightly taller rather than longer. My opinion? I believe it has plenty of height, but that's because I orginated from a 17" LCD. And because most other 22" panels are 1650×1050, the 1080P resoultion of the Benq E2200HD makes up for this. 

If you are in the market for a 22" LCD monitor, I suggest if you can, go see this monitor in person. Your eyes won't lie. 

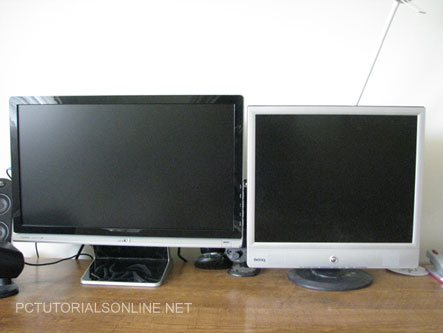
E2200HD Left, Fp71E+ Right


If you enjoyed this post, make sure you subscribe to my RSS feed!

How to Copy Error Messages In Windows

Posted by: pctutorials  :  Category: How To, Tips, Windows

Most of you I'm sure have encountered those annoying Windows error messages. To work out the problem, you need to keep the error message/code so that either yourself or a PC technician can debug the error. This usually means having to manually type the error message or using the print screen function. The first method certainly works but can a be little time consuming if it's a long error message. The second method doesn't provide you with raw text, which is inconvenient when you want to send the error message to a friend via MSN or would like to check it out on Google. The method I'm going to show you can be completed in a few seconds. 

  1. On the error message window, press Ctrl+C (copy). This will copy the contents to the clipboard.
  2. Paste the error message where ever you like (eg. Notepad, Google) using Ctrl+V. Done

Just to give you an example here is a error dialogue:

  error-message-dialogue     

Output:

 —————————
Error Renaming File or Folder
—————————
Cannot rename Copy of logo: A file with the name you specified already exists. Specify a different file name.
—————————
OK   
—————————

This should help you resolve those annoying messages in no time ;) .

If you enjoyed this post, make sure you subscribe to my RSS feed!

Watch New Tv Shows For Free Online

Posted by: pctutorials  :  Category: Freebies, Top Software

Most of us watch new TV shows once they are broadcasted on a TV station. But did you know that you can watch new released TV shows online for free? That means you can watch TV shows whenever you like and won’t miss an episode. But how can it be free? The website is supported by minimal ads, which pay’s for the company whom created the show and the hosting server bandwidth costs. However, most of these websites are for US residents only, leaving the rest of us from around the globe without access. Fortunately, there is an easy way to bypass this. Using a VPN tunnel, such as HotSpot’s Shield, will hide your actual location, thus leading the website which hosts the TV show to believe you are from the US. If you already live in the US, go straight to step 3. Here is how to do it:

1.    Download a copy of HotSpot Shield from here and install.
2.    In your internet browser, a HotSpot Shield Toolbar will have been installed. Make sure it is turned on.
3.    Go to http://www.hulu.com and start watching your favorite TV shows.

Now you can enjoy all your favorite TV shows online for free without end until you have had enough. Well, at least pretty close to that. Because the VPN tunneling service is free, you are allocated 3GB a month, which should be plenty unless you’re watching a great deal of TV shows. To make it an even better experience, why not ring up your buddies and let them know how awesome the TV show was by making a free phone call online. No doubt they will be impressed to hear you watched it online for free!

If you enjoyed this post, make sure you subscribe to my RSS feed!

Auslogics BoostSpeed Takes a Test Run

Posted by: pctutorials  :  Category: Top Software, Windows

Auslogic is an Australian based software firm that has just recently released an optimization suite, BoostSpeed. BoostSpeed is an application designed to boost the speed up of your Internet, tweak Windows to its peak performance and help keep your PC running faster, cleaner and error free. That's a big ask for one program as it has to tackle many areas of the PC. Can Auslogics BoostSpeed make the cut? Let's take a look.

Installation is straight forward with no restart required. Starting up BoostSpeed will expose the clean graphical user interface, which makes it easy for anyone to use including those with minimal tech know-how.
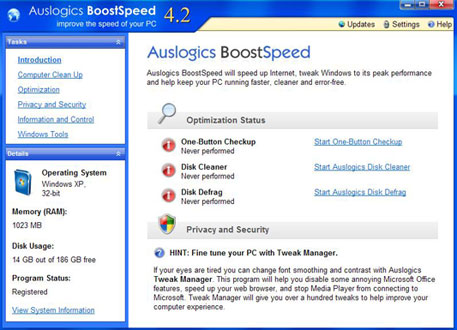
Startup

To give your PC the works, the first step is to click One-Button Checkup; this will scan the registry, your hard disk, check for disk fragmentation and check your system protection. Once scanned it will display a summary of the problems and will ask you to fix them by simply clicking the Fix Now button. 
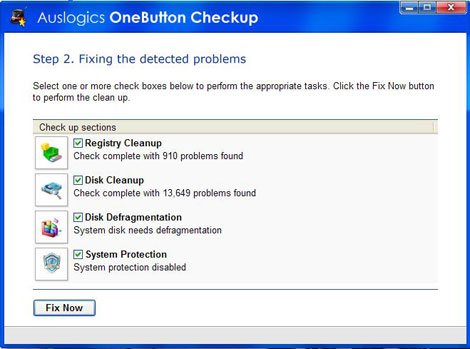
 OneButton-checkup

The One-Button Checkup is probably what most people will use, however if your a power user, BoostSpeed has a lot more to offer. Making our way to the Computer Clean Up tab, you'll be given a list of tools: Auslogics Disk Cleaner, Auslogics Registery Cleaner, Auslogics Uninstall manager, and Auslogics Startup Manager. If you didn't notice, the first two tools mentioned above are used in the One-Button Checkup.

The Uninstall manager is much better than the Windows version. It has the ability to search through programs installed; making is much easier to find the program(s) you wish to uninstall. The layout is easier to read because Auslogic have implemented a grid layout. The service manager is laid out in a similar fashion and is easy to use. 

The Optimization tab unveils a disk Defrag utility, registry defragger, internet optimizer, and a memory optimizer. Both the latter utilities are designed to improve the speed of your internet and free up memory. However, you must note that while there is some gain, it doesn't beat getting a faster internet plan or adding an extra stick of memory, it only optimizes what you have. 

Privacy and Security is the next tab, which has four tools to protect your privacy and increase security. The Track eraser removes any personal data from the PC ensuring your anonymity is secure. PC Security isn't a replacement for an anti virus program; however it does enable some security measures which do help. Also included is a file shredder that removes files beyond recovery.  The Disk Wiper makes sure that files previously deleted cannot be restored so that prying eyes can't get your files.  

Amongst the other extras, you'll find many tools such as Tweak manager which enables hidden tweaks that you didn't know about, System Information tool to retrieve system info and other diagnostic tools to help tune your PC to its full performance.

Auslogics BoostSpeed can very well improve the performance of your PC, and not just in one area, but your complete PC system. After testing out its features, I can verify that this program has improved the speed of my PC. It feels much more responsive. For what it can do, $29.95 is a small amount to pay and saves you doing a lot of manual work and hours trying to improve the performance of your PC. I suggest you take it for a trial run and see what you think: Download

If you enjoyed this post, make sure you subscribe to my RSS feed!
Weird Microsoft Stuff

Posted by: pctutorials  :  Category: Windows

I just came across an interesting post on wizardtec.com.au . It's been discovered 3 bugs can be caused from some of the strangest things. Read on:

3 interesting idiosyncrasies re Microsoft that I found while surfing the net recently. 2 out of the 3 worked on my Windows Vista machine with Office 2003. See how they work for you.

1. CON is not allowed as a folder name

An Indian discovered that nobody can create a FOLDER anywhere on the computer which can be named as ‘CON’.

See if you can create a con folder on your PC.

This is not really a bug and Microsoft do know about this. It goes back to the DOS days and reserved filenames.

Below are other reserved names.

CON
PRN
AUX
CLOCK$
NUL
A:-Z:
COM1
LPT1
LPT2
LPT3
COM2
COM3
COM4

KEYBOARD AND DISPLAY
SYSTEM LIST DEVICE
Auxiliary device, usually a serial port
System real-time clock
Bit-bucket device
Drive letters
First serial communications port
First parallel printer port
Second parallel printer port
Third parallel printer port
Second serial communications port
Third serial communications port
Fourth serial communications port

2. Notepad Bug

1.) Open an empty notepad file
2.) Type “Bush hid the facts” (without the quotes)
3.) Save it as whatever you want.
4.) Close it, and re-open it.
is it just a really weird bug? :-? ?

3. =rand (200, 99) bug

This is a strange bug. At Microsoft the whole Team, including Bill Gates, couldn’t answer why this happened. It was discovered by a Brazilian. Try it out yourself.

Open Microsoft Word and type
=rand (200, 99)
And then press ENTER and see what happens.

If you enjoyed this post, make sure you subscribe to my RSS feed!

How to Backup your WordPress Database

Posted by: pctutorials  :  Category: How To, Wordpress

Considering what happened on this incident , I think it's fitting to write up a tutorial on how to backup your wordpress Database. There are a couple of ways to backup your database, I'm going to show you how to do it using WordPress Database Backup Plugin .

  1.  Extract wp-db-backup.php, upload it into /wp-content/plugins/ and activate it under the Plugins menu.
  2. Click the Manage menu in your WordPress admin area.
  3. Click the Backup sub-menu.
  4. The plugin will look for other tables in the same database. You may elect to include other tables in the backup.                     
    ** NOTE **
    Including other tables in your backup may substantially increase the
    size of the backup file!
  5. Select how you’d like the backup to be delivered:                                                                                                                                                                     Save to server :
  6. this will create a file in /wp-content/backup-*/ for you to retrieve later                                                                                                                                                                            Download to your computer :
  7. this will send the backup file to your browser to be downloaded                                                                                                                                                                 Email :
  8. this will email the backup file to the address you specify
  9. Click “Backup!” and your database backup will be delivered to you.

    When having the database backup emailed or sent to your browser for immediate download, the backup file will be deleted from the server when the transfer is finished. Only if you select delivery method “Save to server” will the backup file remain on your server.

Easy as 1,2,3! I encourage you all to backup your database regularly, otherwise you'll have a lot of work to do to get everything back to normal again. Trust me ;) .  

If you enjoyed this post, make sure you subscribe to my RSS feed!