How to Find Drivers for Unknown Devices

Posted by: pctutorials  :  Category: Tips, Troubleshooting

halfdone

Sometimes in your device manager, you will see a little yellow question mark next to an unknown device. Most of the time, this unknown device can be resolved by installing the correct driver via CD. But what if you don’t have a CD or if the manufacture didn’t provide one?

This is where the freeware application Unknown Devices comes in. By checking the Device Manager for unknown devices and extracting information from it, this program attempts to figure out what the device is.

When Unknown Devices displays the unknown device you are looking for, you can select the text in the list and press F3 which will open up a browser and search for the driver selected. Neat. By the way, the app is also portable so you don’t even need to install it.

If you enjoyed this post, make sure you subscribe to my RSS feed!

Add Google and Wikipedia search to your Start Menu in Vista

Posted by: pctutorials  :  Category: Tips, Windows

If you access or search Wikipedia frequently and if you want to add an option to Search Wikipedia to your Windows Vista Start Menu Instant Search Box, here is what you need to do.

First, click on the Start button and type in the search box GPEDIT.MSC and press Enter. This will open the Local Group Policy Editor. Now you need to navigate to the following policy setting:

User Configuration > Administrative Templates > Windows Components > Instant Search > Custom Instant Search Internet Search Provider

Double click on the policy setting in the right side pane and set it to Enabled. Now you need to simple type the settings in the two boxes provided. For “The string or DLL resource from which to load…” option, type in “Search Wikipedia” and for “The URL to use..” type in the following: http://en.wikipedia.org/wiki/%w

So it should look something like this for your group policy setting:

Pretty simple yeah? Now you would just click OK and restart your computer and you should see the option to search Wikipedia in your Instant Search box.

You can also add other search providers to the Instant Search menu, such as Google or Yahoo. For Google, use the following URL:

http://www.google.com/search?q=%w

For Yahoo search, use the following URL instead:

http://search.yahoo.com/search?p=%w

The only issue you might have is if you’re running Windows Vista Home Basic or Home Premium as they do not have the option to edit the group policy settings in Vista. I believe you have to be using Vista Business or higher.

[Via WinVistaClub]

If you enjoyed this post, make sure you subscribe to my RSS feed!

How to Copy Error Messages In Windows

Posted by: pctutorials  :  Category: How To, Tips, Windows

Most of you I'm sure have encountered those annoying Windows error messages. To work out the problem, you need to keep the error message/code so that either yourself or a PC technician can debug the error. This usually means having to manually type the error message or using the print screen function. The first method certainly works but can a be little time consuming if it's a long error message. The second method doesn't provide you with raw text, which is inconvenient when you want to send the error message to a friend via MSN or would like to check it out on Google. The method I'm going to show you can be completed in a few seconds. 

  1. On the error message window, press Ctrl+C (copy). This will copy the contents to the clipboard.
  2. Paste the error message where ever you like (eg. Notepad, Google) using Ctrl+V. Done

Just to give you an example here is a error dialogue:

  error-message-dialogue     

Output:

 —————————
Error Renaming File or Folder
—————————
Cannot rename Copy of logo: A file with the name you specified already exists. Specify a different file name.
—————————
OK   
—————————

This should help you resolve those annoying messages in no time ;) .

If you enjoyed this post, make sure you subscribe to my RSS feed!

Disable Auto Restart

Posted by: pctutorials  :  Category: Tips, Windows
Disable auto restart

Many times before I’ve had windows continuously ask me to restart the PC after having installed a new update. I’d don’t mind when it tells me once, but every 10 minutes or so can get very annoying, and when critcal updates are installed, it has a self timer to restart itself if the user doesn’t interfere, thus loosing any unsaved work. This can cause serious problems for the end user and wasted time. Fortunately, there is a fix.

• Select Start>Run and type in ‘gpedit.msc’.

• In the policy editor, browse to Computer Configuration>Administrative Templates>Windows Components>Windows Update.

• Then, in the right-hand pane, double-click ‘No auto-restart for scheduled Automatic Updates installations’ and, in the window that shows, click ‘Enabled’ and select ‘OK’.

That should rid your woes of that restart reminder. Just remember to restart your computer when it suitable for the new updates to take place.

If you enjoyed this post, make sure you subscribe to my RSS feed!

The PC Decrapifier

Posted by: pctutorials  :  Category: Tips, Top Software, Windows

What on earth is The PC decrapifier? It’s a program that removes “crapware” from your new PC. It gets rid of that bundled software that Dell or Toshiba ect. put on for you such as Wild Tangent Game Console, AOL Toolbar (5.0), Vonage and much more. This crapware takes up valuable storage space, uses up memory and even internet bandwith as some crapware checks for new updates. Runs perfectly on XP and Vista and is always being updated for new crap to be removed.

So how come vendors install this crapware? Because they get money for installing it on thier PC’s from the companies that make this stuff. It’s shameful really, I mean I don’t mind when they throw in a 3-month trial version of anti-virus software that works, but setting hompage’s to advertisment and installing 3rd party search bars is a no go in my books. If you’re after a free copy of this magnificant piece of software, you can get it here. Your PC will thank you and you should gain some extra PC performance.

If you enjoyed this post, make sure you subscribe to my RSS feed!

Enable Games In Vista Business

Posted by: pctutorials  :  Category: Gaming, Tips, Windows

Games in Vista

Microsoft Vista Business is designed for the work enviroment. Microsoft didn’t think you’d be playing games whilst working. But think again! The games are there, just not enabled. As long as you have Administrator rights, you can enable the default games by doing the following:

  • Go to Control Panel and select Programs and Features.
  • Select ‘Turn Windows features on or off’.
  • Then, in the Windows Features dialog, select and enter a tick in the ‘Games’ entry.

If you become bored at work or having nothing to do at lunch break, you can have a good old game of solitaire to kill some time ;) .

If you enjoyed this post, make sure you subscribe to my RSS feed!

How to Increase Your Wifi Signal

Posted by: pctutorials  :  Category: Freebies, How To, Networks, Tips

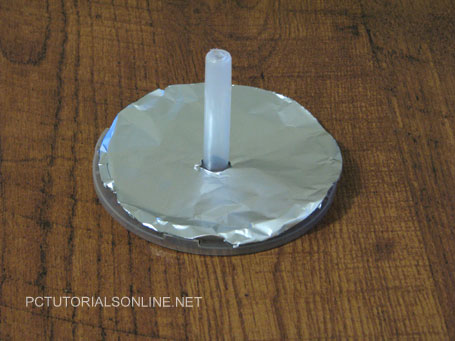
I had read about people boosting their wifi signal using kitchen utensils to food containers such as Pringles. This was an easy way to boost your signal and to increase your transfer speed. I thought this was all well and good, but what if you did not want to sacrifice you only food dish strainer? Or what if you did not eat Pringles (I don’t)? I set myself on a misson to find a object that most households would have or could easily obtain. It struck my mind that most people had spindle packets of CD-R’s, which previsouly I wrote about how to fix that side hole on your PC Case with a CD protector.After a about half an hour of planning and construction, I came up with the following:

DIY Wifi Booster
I know, masterpiece isn’t it?
Yep, doesn’t look professional but this CD-R spindle pack combined with a silver foil is the bomb. So how do you go about making one I hear you say? I’m glad you asked. You’ll need the following resources:
1x Empty 50 CD/DVD spindle pack
1x 13cmx13cm silver foil
1x X-acto knife or similar
1x Cutting board
1x Marker
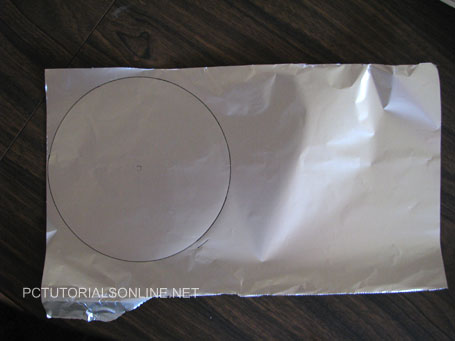
The main point is to get the silver foil cut and fitted to size. For that, you’ll need to place your empty CD spindle pack on the tin foil and trace around it with a marker. NOTE: Try to keep the silver foil as flat as possible because crinkling the foil can lessen the wifi signal boost.
Traced
Note the smaller circle in the middle; you’ll need to cut this out too.
Place the silver foil on the cutting board, and using the X-acto knife, slowly cut out the two circles. Once they’re cut out, place the silver foil over the empty CD spindle pack and you’re just about done. All you have to do now is place your new wifi signal booster over your router’s aerial like so:
Yes, I’m in search of alien activity :P
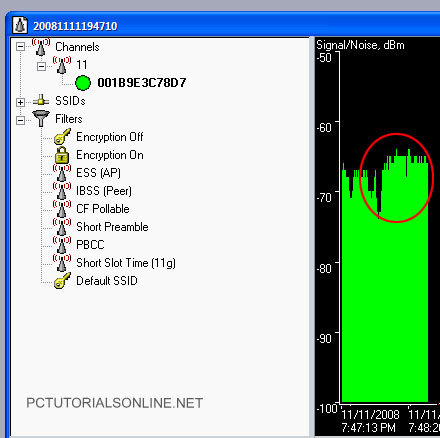
The signal increase is questionable as I don’t not have any fancy testing equipment, but Network Stumbler showed an increase of signal:
Wifi Results
Every bit counts

Even though the increase is minimal, I still had fun making this project. If you give this a go , please leave a comment on how it went :) .

If you enjoyed this post, make sure you subscribe to my RSS feed!

Missing USB Cable?

Posted by: pctutorials  :  Category: Tips

I don’t know about you, but half the time I can never find a USB cable to attach my camera or mobile phone to my PC. Because I have multiple PC’s in the house, cables are shifted from one room to another and then when I need to go attach a USB device to the PC I’m on, I don’t have one. So, I came up with the solution of always leaving a a USB cable attached to the USB port on the back of my PC and leave the other end on my desk. That way, I don’t loose time searching for such a necessary item.

USB Cable
Ingenious isn’t it? :)

If you enjoyed this post, make sure you subscribe to my RSS feed!