Recover From Corrupt Bootsector

Posted by: pctutorials  :  Category: Tips, Windows

I just finished up fixing a friends PC that had a interesting problem. It would mysteriously reboot itself every time it got to the windows bootup screen. I couldn’t understand it, it wouldn’t even allow me to access safe mode! So i pulled out the Windows XP Home disk and ran the repair console. I first tried the dir command, however it said invalid directory. I then tried FixMBR, however it said there was a problem with the bootsector.

With this in mind, Chkdsk was next on the list. It took about five minutes to scan and after it was done, it said it had successfully repaired hard disk errors. This time the dir command worked and I could see files and folders listed there, which was a good sign. Learning this, I rebooted the computer, hoping that it’d bootup properly this time. And luckly, it did. Everything was backup and running as it normally had been.

What had me really tossed was that my friend said he had be using msn then all of sudden it froze up. My conclusion would be that a virus corrupted the bootsector, but I can’t verify this. Anyone else experienced this?

If you enjoyed this post, make sure you subscribe to my RSS feed!

Save Hard Disk Space with Clone Tools

Posted by: pctutorials  :  Category: Tips, Top Software, Windows

Clone tools
Petter Ackebo recently introduced me to a unique program called Clone Tools. Clone Tools is a Windows duplicate file finder that finds folders with shared or identical content. With a click of a few buttons, I managed to get a list of duplicate files that I didn’t even know existed!

One of the features that stood out to me was that it didn’t allow you to delete the last copy of your file ensuring you won’t loose important data. It also forbids you to delete windows files as deleting these files could cause problems. Layout of the GUI is well presented and easy to navigate, as only a minimum amount of buttons are present. On the Clone Tools website, you can find a quick tutorial to give you a brief description on how to use Clone Tools which was very easy to follow. Scanning time obviously depends on the amount of files you are scanning and the speed of your computer, but I found it to be rather snappy.

Overall, if you’re looking to save time and space, I suggest you check it out; it got me back some useful hard disk space.

If you enjoyed this post, make sure you subscribe to my RSS feed!

Relax Your Eyes

Posted by: pctutorials  :  Category: Tips, Top Software, Windows

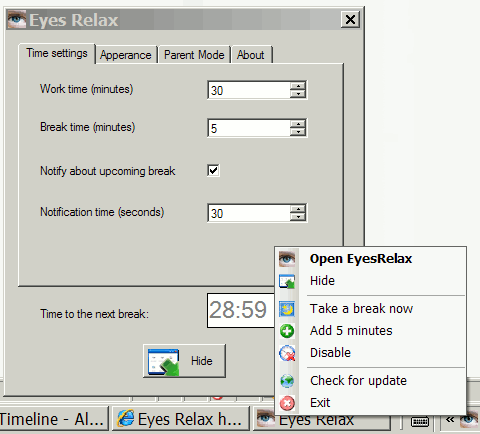
Today, I came across a nice windows utility called Eyes Relax. This piece of freeware reminds you to rest your eyes at a user-set interval and can set a break time. Resting your eyes from computer screen is vitally important as focusing on a single object all day long will cause eye strain.

Also, a recently added feature to the utility is parent mode. This can be used to protect your children, forcing them to take breaks. In parent mode the program cannot be disabled and the computer is password-protected during a break. This is very useful since children often forget about the real world and play video games much too long. You can download this wonderful utility from the Eyes Relax author page here: Eyes Relax 0.36

Eyes Relax

If you enjoyed this post, make sure you subscribe to my RSS feed!

Increase Vista/Xp Boot Up Speed on Dual/Quad Core CPU’s

Posted by: pctutorials  :  Category: Tips, Windows

Over at MeraWindows, member dmudgal has come up with a nice tip to increase both XP and Vista’s bootup time. He’s also created a simple script to clock the boot up time, so that you can verify the difference. Here’s how to do it:

1. Open up notepad, copy and save the following as XPReboot.vbs :

Option Explicit
On Error Resume Next
Dim Wsh, Time1, Time2, Result, PathFile, MsgResult, MsgA, AppName, KeyA, KeyB, TimeDiff
MsgA = “Warning! Close all running programs and click on OK.”
KeyA = “HKEY_CURRENT_USER\Software\RestartTime\”
KeyB = “HKEY_CURRENT_USER\Software\Microsoft\Windows\CurrentVersion\Run\RestartTime”
AppName = “Boot Up Time”
Set Wsh = CreateObject(”WScript.Shell”)
PathFile = “”"” & WScript.ScriptFullName & “”"”
Result = wsh.RegRead(KeyA & “Times”)
if Result = “” then
MsgResult = Msgbox (MsgA, vbOKCancel, AppName)
If MsgResult = vbcancel then WScript.Quit
Wsh.RegWrite KeyA & “Times”, left(Time,8), “REG_SZ”
Wsh.RegWrite KeyB, PathFile, “REG_SZ”
Wsh.Run “cmd /c Shutdown -r -t 00″, false, 0
else
Wsh.RegDelete KeyA & “Times”
Wsh.RegDelete KeyA
Wsh.RegDelete KeyB
TimeDiff = DateDiff(”s”,Result,left(Time,8))
MsgBox “Your system reboots in ” & TimeDiff & ” seconds”, VbInformation, AppName
end if
wscript.Quit

2. We know want to check the time it takes to boot up before applying tweak. Click on XP Reboot.vbs and hit Enter. A dialog box will appear giving you a warning that the file you are about to run is an executable and it may contain viruses. I can gurantee the script you just saved does not contain a virus. Clicking Ok will reboot the computer, which is what we want.

3. After the reboot, you’ll see a dialog box which will be display the time taken by your system during reboot. Note this time.

4. Lets apply the tweak. Click Start>Run and type msconfig.

5. This will take you to the System Configuration dialog box. Click on the Boot tab given in the upper side of the dialog box and click Advanced Options button. Here click the check box for Number of Processors. This will activate the drop down menu given just below it.

6.If you have a Dual Core CPU select 2 or if you have a Quad Core CPU select 4. Press OK and Apply changes. Windows will now ask for your confirmation for the changes that you’ve made in the boot settings. Click Yes and press Restart button in the following dialog box.

7. After coming back to windows you’ll have to restart your system again by clicking on the XPReboot.vbs file (like you did before) because this will give us the time taken by the system to boot up.

8. When you get back to windows you’ll see the same dialog box displaying the time in seconds. Compare it with the previous one and see if there is some improvement.

If you enjoyed this post, make sure you subscribe to my RSS feed!

Recover From Explorer Crash

Posted by: pctutorials  :  Category: Tips, Windows

Restore from windows crash

How is it that Windows decides to crash when you’re working on that important document, or editing that perfect art piece in Photoshop? Microsoft Windows does have a tendency to crash so it’s important to save often. But what if you’ve forgotten to save that file? If your PC has crashed on a software level, it may be possible to recover the file or document that you were working on depending on the severity of the crash.

A good indicator to whether or not you can recover from the crash is to verify the num lock led can be turn off and on. If it can, it means your PC is still responsive. Here’s how to recover from an explorer crash on XP or Vista:

1. Press together ctrl, alt, delete to open the Windows Task Manager.
2. In the processes tab, find explorer.exe . Right click and End Process. You should be left with a blank desktop with no taskbar.
3. Open up the Windows Task manager again (ctrl ,alt , delete), click file>New Task and type “explorer.exe” (w/o quote).
4. This should resurrect all open programs and bring back the desktop and taskbar.

And hopefully, the file in which you were working has been left intact. But remember; don’t substitute this tip for saving your work regularly. ;)

If you enjoyed this post, make sure you subscribe to my RSS feed!
How to Increase Network Browsing Speed

Posted by: pctutorials  :  Category: How To, Networks, Tips, Windows

If you’ve ever browsed folders on a network, you’ll know how slow it can be. With a simple registry hack, you can increase your network browsing speed. Here’s how to do it:

  1. Click Start>Run and enter ‘regedit’.
  2. Navigate to HKEY_LOCAL_MACHINE/Software/Microsoft/Windows/Current Version/Explorer/RemoteComputer/NameSpace
  3. Locate the key named {D6277990-4C6A-11CF-8D87-00AA0060F5BF}. This key tells Windows to search for scheduled tasks, of which there are none. Right click on it and delete it.
  4. If you have no use for viewing remote shared printers and is only interested in shared files, consider deleting the printers key as follows: {2227A280-3AEA-1069-A2DE-08002B30309D}. This will further improve network browsing speed.

Your networking browsing speed should be now considerably faster, as it will have no delay.

If you enjoyed this post, make sure you subscribe to my RSS feed!
Vistamize XP

Posted by: pctutorials  :  Category: Tips, Windows

A lot of people quite like the look of Vista, but cannot buy it because their PC isn’t powerful enough and don’t want to spend money upgrading either. There are many WindowBlinds themes created by users that look like Vista, but this doesn’t give you the Vista startup screen, Shutdown screen, sidebar and so on. You could argue that using WindowBlinds, along with other third party tools to create the Vista experience is a good solution. But what if you could transform Windows XP to Vista with one program? That would be a lot easier, wouldn’t it?

Thanks to Manuel Hoefs, you can use VistaMizer to emulate Windows Vista on XP. It creates a most adequate replica of Vista, using a single installation program with easy to follow prompts. Installation does however modify system files, but they can be restored back to their original state easily as the program creates a system restore point before modify them if you need to. You can download the program from:

http://vistamizer.uptodown.com/en/

Vistamize XP

If you enjoyed this post, make sure you subscribe to my RSS feed!
Turbocharge Defrag In Windows XP

Posted by: pctutorials  :  Category: Tips, Windows

Not long ago, i talked about Why you shouldn’t use windows’ Defragger. Most of you realize that it’s important to defrag often to keep your hard disk fast and efficient. But did you know that the best time to defrag is just after you’ve started your system? That’s because defragmentation is quicker when the defragmentation tool doesn’t have a large page to handle.

You could fumble around the the start menu to start defragging at startup, but a better solution is to add a scheduled task. The other option is to do a regisrty hack, but a scheduled task is more customizeable, as you probably don’t want to defrag each time you boot up your PC. If you’re using a third party defragging utility, chances are it should have a built-in scheduler.

If you enjoyed this post, make sure you subscribe to my RSS feed!