I spent a significant amount of time setting up CiviCRM yesterday, only to discover there was a mismatch between the timestamp provided by the MySQL server and PHP. Normally, modifying the php.ini file (specifically the date.timezone value) adjusts PHP’s timezone. Yet, running phpinfo() still showed the timezone had not been changed. There were no other ini files being loaded, so I did some more snooping in the settings of RunCloud. A Google search result led me to a FaceBook page that had a change log for RunCloud’s app. Turns out it’s possible to tune PHP for each specific app and adjust the timezone within RunCloud’s interface. To change the timezone in a specific RunCloud web app, do the following:
1. On the Server page, click Web Apps.
2. Click on the app you wish to modify the timezone of.
3. Click settings on the left hand panel.
4. Scroll down to PHP settings and you’ll see the second value is date.timezone. Modifying this accordingly.
5. Hit Update Web Applications Settings and you should be good to go.
To verify the change, run phpinfo(); in a php file and locate the date.timezone value to see if it has updated.
If you’re like me and also setting up CiviCRM, you’ll need to update the timezone within Wordpress. Go to Settings>General and select the time zone drop down.
It’s important to have all systems on the server running the same timezone, otherwise timestamps for payments will be incorrect and backups won’t run at correct times. I’m really enjoying RunCloud at the moment and will probably do some further posts about it — it’s very handy for managing VPS’s.
I recently ran out of space on my hard disk, and so I decided to delete the Linux partition to free up some space. I then extended the Windows partition to make use of the additional space. In the the process, I mistakenly deleted the boot partition. Reading up the on the net, Windows 10 does have some built-in recovery tools and commands to rebuild the boot loader, but because I had deleted the EFI partition, it was having trouble recovering. So here’s what I did:
1. Download a live CD/USB image of GParted and boot using the corresponding media. There is setup instructions on the site.
2. After booting with Gparted, you need to create an additional partition for the boot loader. I had to shrink the existing partition. To shrink, Select the partition from the list. In the menu, Select Partition > Shrink. I set it to 120mb before the primary partition. This may take a while depending on the size and speed of your hard disk. It took me about 30 minutes on my 256GB SSD.
3. Format the new partition using the FAT32 Fileystem. I set the flag as primary.
4. Reboot the machine with a Windows 10 Disk/USB to get into the recovery options. Select cmd tool.
5. Enter the following commands:
bootrec /fixmbr
bootrec /fixboot
bootrec /rebuildbcd
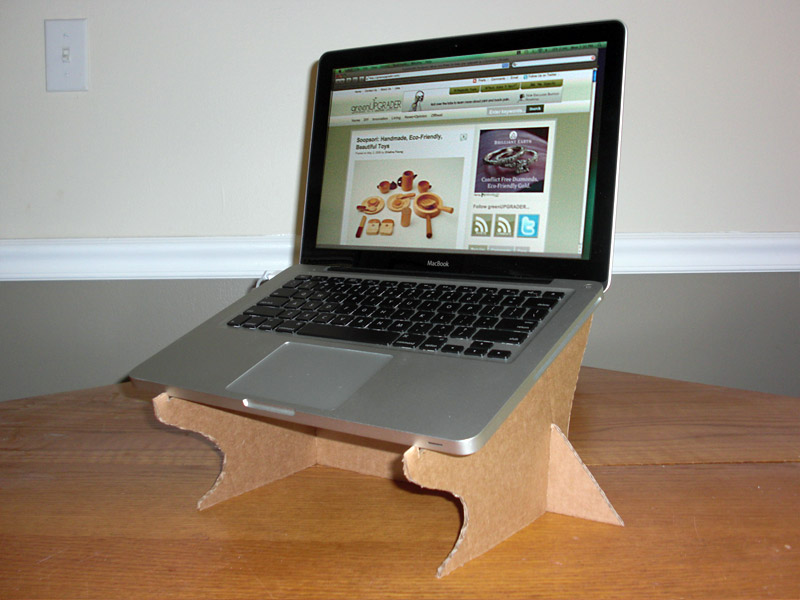
GreenUpgrader has managed to create an usable and cheap laptop stand. I know it doesn't look a million dollars but hey, it will certainly increase airflow to the Laptop and will provide better screen position. Head over to GreenUpgrader to print out the template yourself and give it go. The how-to article is easy to follow and has plenty of pictures to go with it. My laptop is out for repairs at the moment and does weigh a fair bit. With a few modification, I might just have myself a cheap, effective and usable cardboard laptop stand. Have fun!
I mentioned a while ago that I would create a how to video on using your Guitar Hero World Tour Drum kit on your PC. Thanks to Magnus’ PS360MIDI Drummer software, the ability to use the GH:WT drum kit on PC became possible. To think that you could turn a gaming controller into a high quality midi controller is amazing. Something like a Yamaha DTXpress costs $800 AU + .
I realize you can’t compare the GT:WT drum kit to fully decked electronic drum kit, but for less than $150 , the Guitar Hero World Tour Drum Kit does a pretty awesome job. Watch the videos below on how to setup your Guitar Hero World Tour Drum Kit on PC.
If you have a rock band 2 drum kit and can provide some technical data for Magnus so that he can add rock band 2 support , you can contact Magnus at magnus.ellinge[at]gmail.com
If you get a bit more serious into drum playing and/or recording, consider purchasing the full version of Addictive Drums which will give you access to the full, multiple drum kits, which by the way, sound excellent. If you don’t have a digital audio workstation, FL studio is something worth buying; I use it and can not fault it.
Have fun drum playing and if you get any videos up of your drum playing on your GT:WT drum kit, post them in the comment section!
So you’ve been browsing Myspace bands and found a really awesome song that you want to download? Some bands disable the ability to allows users to download their MP3’s, however it is still possible to download songs from their Myspace page.
Just a note: If you really enjoy the music produced by that artist, I’d recommend you buy the artists’ tracks so that he/she/ or the band can continue to produce awesome music.
Before you start, downloading these songs with Firefox will retain the filename of the song, so that you won’t have to manually enter the song name. Get Firefox 3:
Here’s how to download Myspace songs:
Go to File2HD.com and enter in the myspace URL of the band/artist.
Tick the agreement box and set the filter to Audio.
Press get files and a list of songs in MP3 format should appear.
Right click on the MP3 file(s) you wish to download and select Save Link As … and click OK.
Most of you I'm sure have encountered those annoying Windows error messages. To work out the problem, you need to keep the error message/code so that either yourself or a PC technician can debug the error. This usually means having to manually type the error message or using the print screen function. The first method certainly works but can a be little time consuming if it's a long error message. The second method doesn't provide you with raw text, which is inconvenient when you want to send the error message to a friend via MSN or would like to check it out on Google. The method I'm going to show you can be completed in a few seconds.
On the error message window, press Ctrl+C (copy). This will copy the contents to the clipboard.
Paste the error message where ever you like (eg. Notepad, Google) using Ctrl+V. Done
Just to give you an example here is a error dialogue:
Output:
————————— Error Renaming File or Folder ————————— Cannot rename Copy of logo: A file with the name you specified already exists. Specify a different file name. ————————— OK —————————
This should help you resolve those annoying messages in no time .
Considering what happened on this incident , I think it's fitting to write up a tutorial on how to backup your wordpress Database. There are a couple of ways to backup your database, I'm going to show you how to do it using WordPress Database Backup Plugin .
Extract wp-db-backup.php, upload it into /wp-content/plugins/ and activate it under the Plugins menu.
Click the Manage menu in your WordPress admin area.
Click the Backup sub-menu.
The plugin will look for other tables in the same database. You may elect to include other tables in the backup. ** NOTE ** Including other tables in your backup may substantially increase the size of the backup file!
Select how you’d like the backup to be delivered: Save to server :
this will create a file in /wp-content/backup-*/ for you to retrieve later Download to your computer :
this will send the backup file to your browser to be downloaded Email :
this will email the backup file to the address you specify
Click “Backup!” and your database backup will be delivered to you.
When having the database backup emailed or sent to your browser for immediate download, the backup file will be deleted from the server when the transfer is finished. Only if you select delivery method “Save to server” will the backup file remain on your server.
Easy as 1,2,3! I encourage you all to backup your database regularly, otherwise you'll have a lot of work to do to get everything back to normal again. Trust me .
I don’t know about you, but I’d save $100 rather than spending it on an official Xbox 360 wireless G adapter. I also know it’s possible to buy a Linksys WRT54GS and use it as a bridge, but your still spending money. If you have a computer that already has a wireless connection and that is close by your Xbox 360, you’re in luck. Using a Ethernet cable, you can attach your Xbox 360 to your computer, then share the internet connection via the wireless. Interested? Here’s how to go about it:
Attach a Cat5E Ethernet cable to your PC to the Xbox 360.
Turn on your Xbox 360. On the PC, enable the Wired LAN port. You should get a connection however windows will display a limited connection notification, which you don’t need to worry about now.
On the Wireless Connection icon in Network Connections, Right-click and select properties >Advanced tab> select a tick in “Allow other network users to connect through this computers Internet Connection”> Select from the combo box the Wired Lan Connection, in my case “Local Area Connection”. Click OK. See screenshot for details.
Back to your Xbox 360, Test Xbox Live in the networking settings options. You should now have successfully attached your Xbox 360 to the internet.
I haven’t tested any FPS (or any games) online over this connection as I don’t have a Gold Membership. Also, you will need to have your computer switched on to be able to use Xbox 360 online because the PC is the gateway. Still, not bad for free wireless for your Xbox 360!